CiSRA Puzzle Competition 2013 - Solutions
5E. Fly in a Box
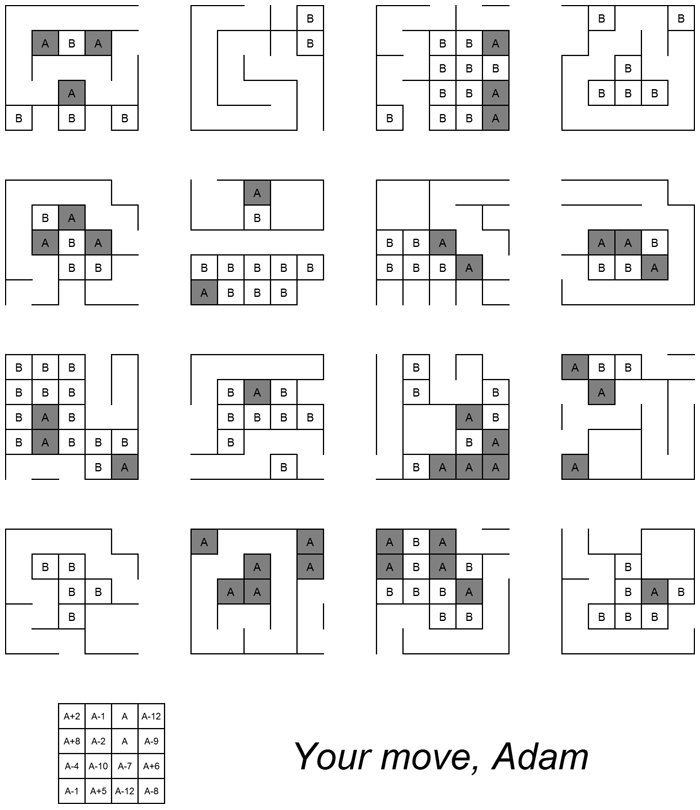
This puzzle shows a collection of partially-completed boards for the game Dots and Boxes. The text tells you that it's currently Adam's move, and you are intended to assume that he is player 'A'. For the purpose of this solution, his opponent is named Brenda. Given a set of partially completed game boards, a puzzler may feel an urge to complete them - with optimal play from both sides of course. If so, they're on the right track.
However, despite a popular conception that Dots and Boxes is a trivial child's game, this is a far from straightforward task, as a few lesser-known strategies open the game up into something quite involved and tactical. For example, the Wikipedia article linked above describes the tactic of declining boxes (or "double cross" as it's called there), but there's still a fair bit more understanding needed to solve these boards. This is an intentionally difficult working step. Here are the general principles involved:
- Declining an open chain. This is where a player takes all but two boxes in an open chain (open to the outside of the grid), sacrificing those two boxes to force their opponent to give you the next chain (which may be much longer than two boxes!). This option can apply to any open chain of length 3 or greater.
- Declining a closed chain. As above, except that to decline a closed chain, rather than sacrificing 2 boxes, 4 boxes must be sacrificed (by creating two 2×1 rectangles with the last four in the chain).
- Declining an optional 2×1 chain. Some chains of length two that are capturable also have the option of being declined. Declining a 2×1 chain that's open on both ends is possible if the opponent makes the mistake of setting it off at one end rather than in the middle. It is always optimal to set off such a chain in the middle, which avoids giving an opponent the option of declining the chain.
- Controlling parity. More generally, declining is a tactic which controls the parity of the game, i.e. who's turn it is. If the remaining moves would give close to equal scores for each player it may not be worth doing, but when the next smallest chain is longer than the boxes sacrificed by declining, it can be the best move.
- Optimising relative costs. Because closed chains require a greater sacrifice to decline, it's preferable to set off closed chains over open chains of any given length. It's also preferable to set off shorter chains first.
Optimal play leads to an unambiguous assignment of boxes to each player. A full step by step solution to each of the 16 boards is given in an appendix, below. (As well as notes on some unfortunate errors in the puzzle.)
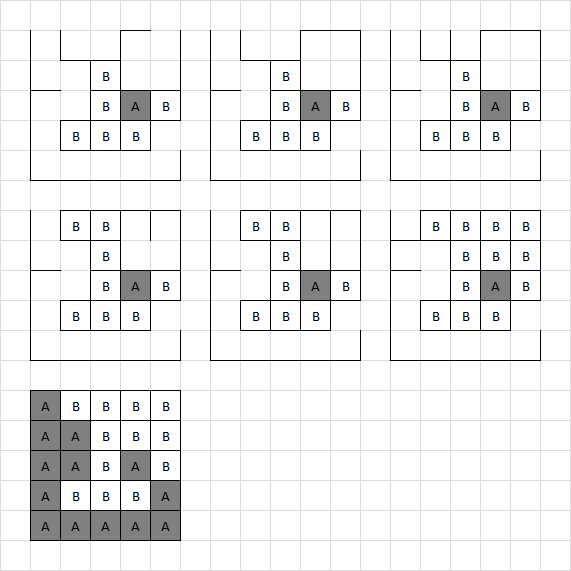
The next step involves the grid in the bottom left. The letter 'A's in each cell and the 4×4 size matching the number and layout of the game boards suggests counting the number of boxes assigned to Adam at the completion of each game. Converting these numbers to letters by standard alphabet indexing yields the following message:
GAME
OFLI
FEGO
ONCE
The top row of boards are designed to be relatively easy to solve, allowing the word GAME to be spotted early on, confirming this approach. The need to make a sensible message helps to confirm the number of boxes Adam achieves with optimal play, which is important as the exact assignment of boxes to players is required for the next step.
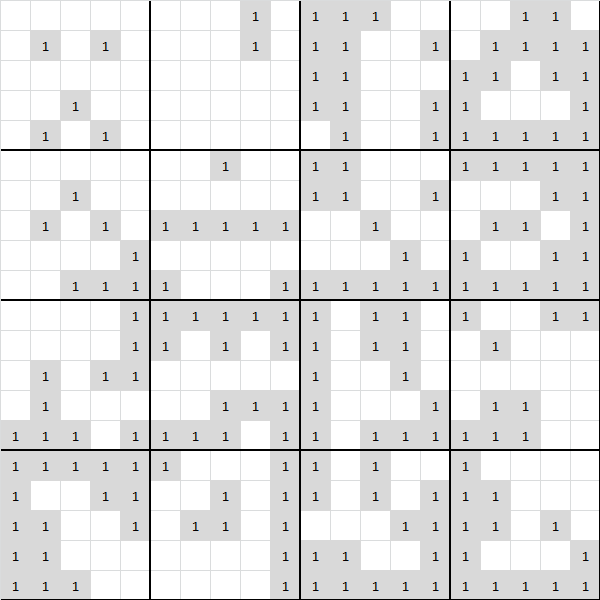
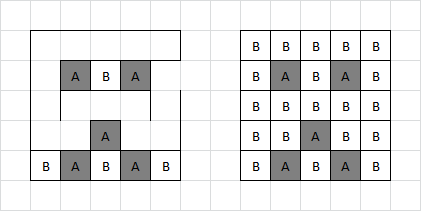
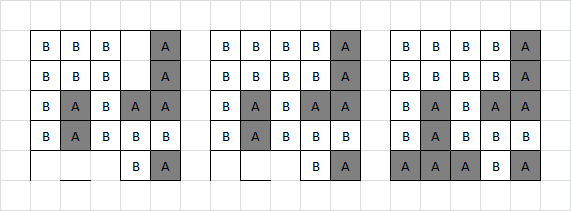
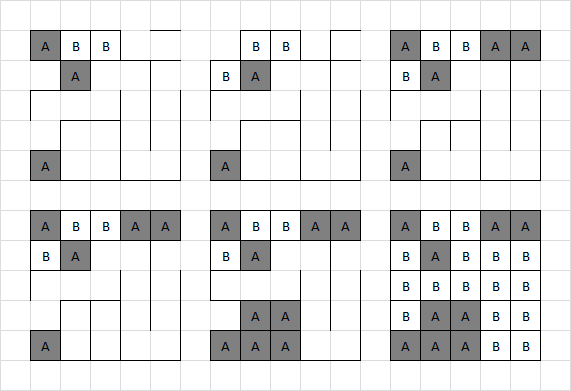
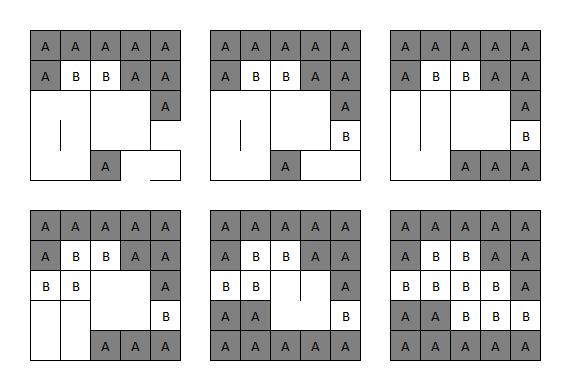
As the message GAME OF LIFE GO ONCE suggests, the next step involves Conway's Game of Life. The trick is to join all of the completed boxes boards together. Adam's existing boxes being filled in suggests that his boxes correspond to "live" cells:
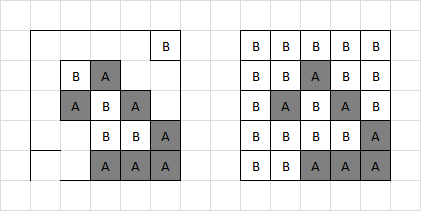
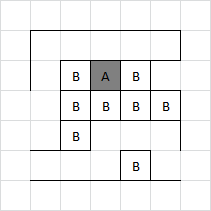
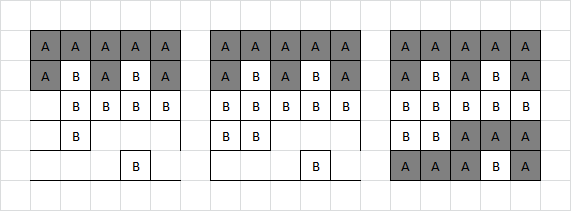
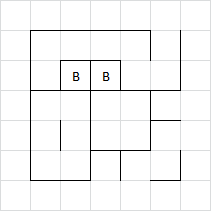
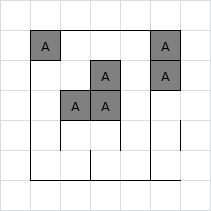
As suggested by "go once", the next step is to perform a single iteration of the Game of Life rules on these combined boards. Doing this causes a non-random structure appears from the mess:
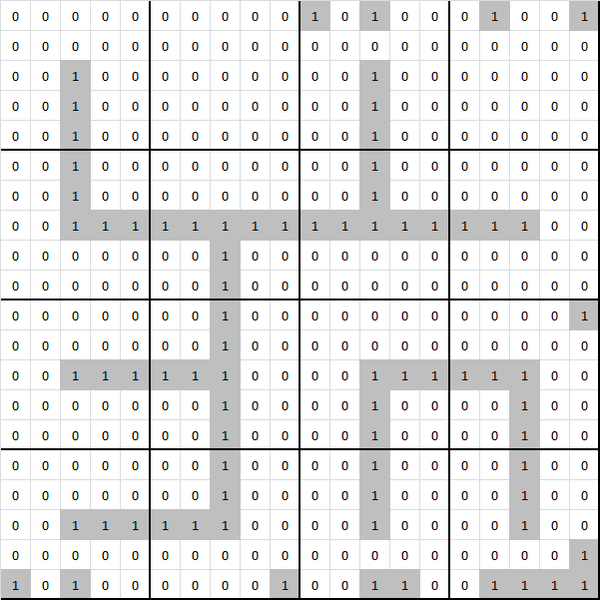
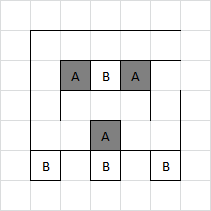
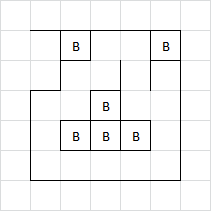
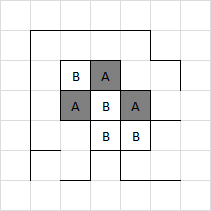
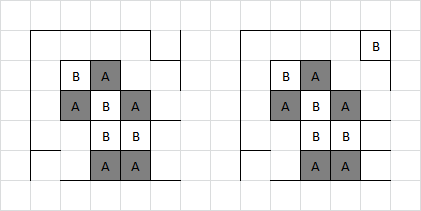
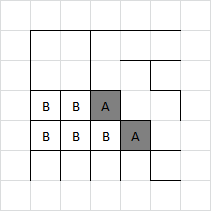
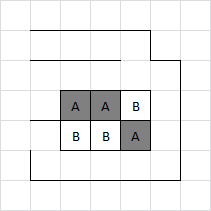
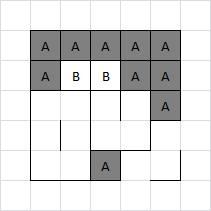
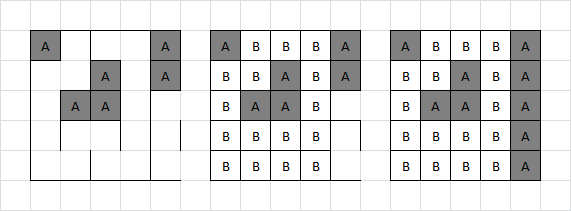
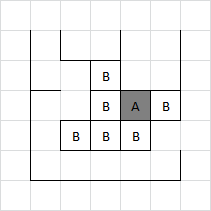
The junk around the edges depends a little on how the boundary is treated (wrapped, padded with live cells or padded with dead cells). The structure in the middle is what's important. It may be recognisable as another boxes board! This time the board is 3×3. The solution to this board is relatively trivial. Adam takes the free boxes then gives Brenda the single box in the top right. Brenda gives Adam the remaining two boxes up the top, then Adam gives Brenda the final chain of 3. That gives a result which again does not particularly look like anything, but that's because there's one further recursion step still to be done, namely another Game of Life iteration:
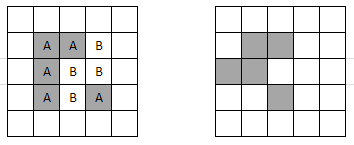
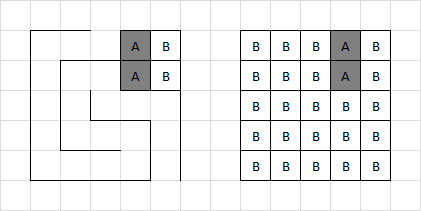
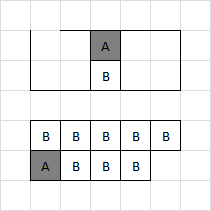
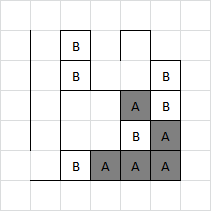
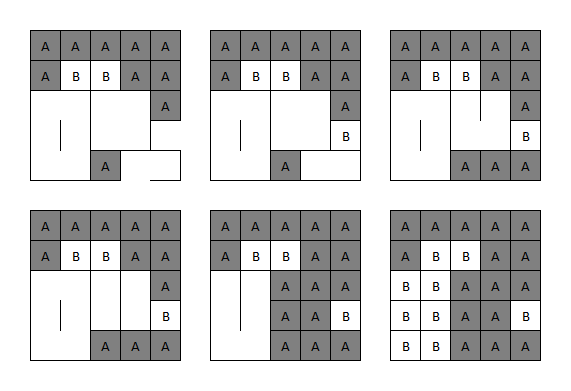
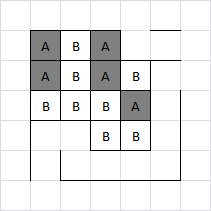
The shape produced on the right is a Glider, a repeating pattern which moves one square diagonally every four iterations. This ties in with the title by being a "fly"er trapped in these games of boxes. GLIDER is the solution to the puzzle.
Appendix: Solutions to individual grids
Note: Because this puzzle was lovingly created by hand, boxes is actually a surprisingly complex game, and none of the testers understood it any better than the creator, there were unfortunately a couple of errors in it. In hindsight we should have written (or found) a program to automatically solve these rather than thinking we could do it by the power of logic alone! The error we corrected during the competition in grid C3 was a simple transcription/version-control error, but unfortunately there were also problems with grids D1 and D4. The good news is that the puzzle had built-in redundancy in terms of the message helping to confirm the "correct" (or at least intended) outcomes, so teams were still able to solve it. A fully corrected version of the puzzle, made after the competition closed, is given at the very end of this page.
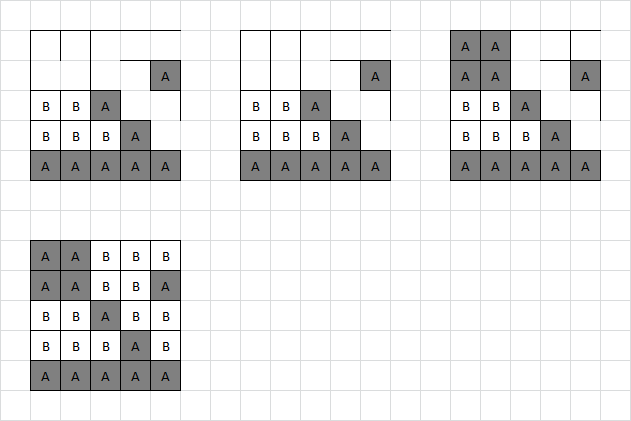
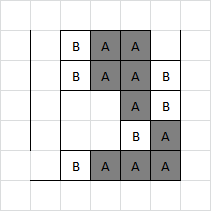
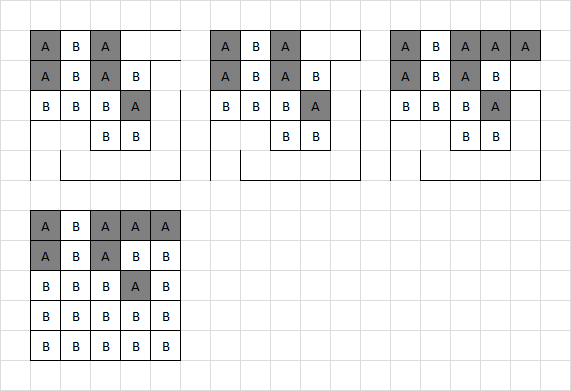
A1:
Adam takes the free boxes at the bottom, then has no choice but to set off the remaining chain. Brenda then happily takes the rest.
A2:
Adam takes the free boxes in the top right, then has no choice but to set off the remaining long chain. Brenda then happily takes the rest.
A3:
Adam sets off the pair in the top right (being careful to play in the centre of it). Brenda take both boxes but must then give Adam the remaining chain.
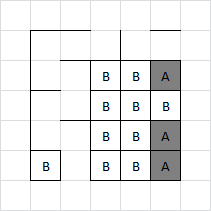
A4:
Adam takes the free box near the top right, then sets off the pair on the top left (being careful to play in the centre of it). Brenda takes both boxes, then has to concede the closed loop to Adam.
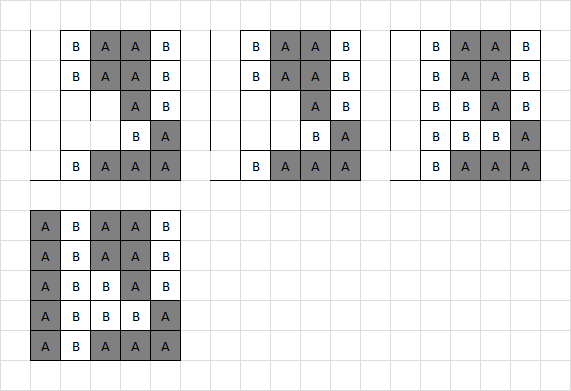
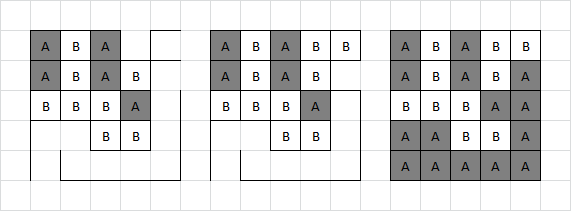
B1:
Brenda has cleverly (see B4) given away two boxes at the bottom, which Adam loses nothing by taking. Adam then gives Brenda one box in the top right. Brenda takes that box, and gives Adam the two in the bottom right (carefully playing in the centre of them):
Adam takes those boxes, then must set off the remaining long chain for Brenda.
B2:
If Adam sets off the four boxes in the top left corner, Brenda can take all four, and will eventually claim the centre row of five, giving Adam a total score of 7:
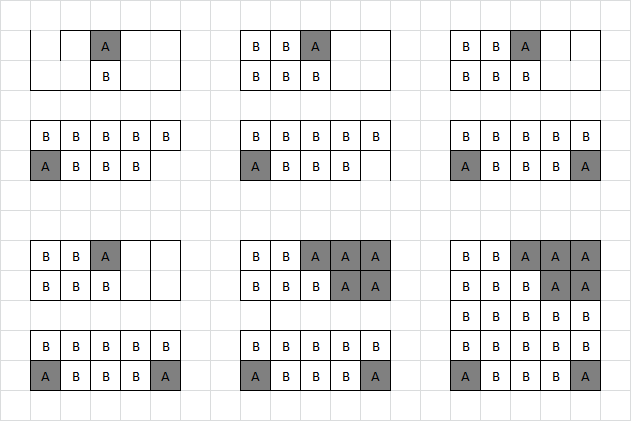
Adam's best move is to instead simply close the 2×2 box in the top left. Brenda gives Adam the bottom right corner, and then Adam must give away one of the 2×2 areas:
Brenda is best off taking the four boxes, as there is little profit in declining them. Brenda then sets of the remaining 2×2 for Adam, who declines it in order to take the middle row of five instead.
B3:
A particularly unrealistic board, Adam has a bunch of free boxes to collect. After that, he has to set off a chain for Brenda. Adam prefers to set off the closed loop, since Brenda must sacrifice four boxes to decline a closed loop but only two to decline an open loop.
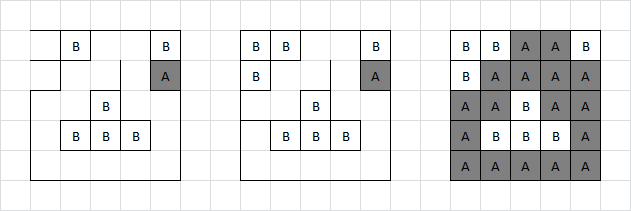
B4:
The natural move here is the "safe" move on the left. Let's see what happens however if Adam takes it. Brenda will give Adam the top right box, and Adam must set off a chain. No matter how Adam does it, Brenda can decline the last two boxes in it to claim the rest of the board:
However, Adam can do better. As soon as a chain is of length 3 or longer, whoever gets it will have the opportunity to decline the last two boxes. However, one of the branches in this board is currently only two boxes long. By giving it away now, Adam robs Brenda of the opportunity to control the parity of the game by declining the last two boxes.
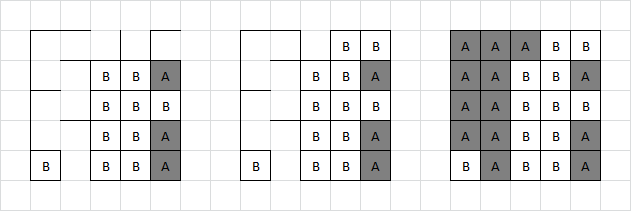
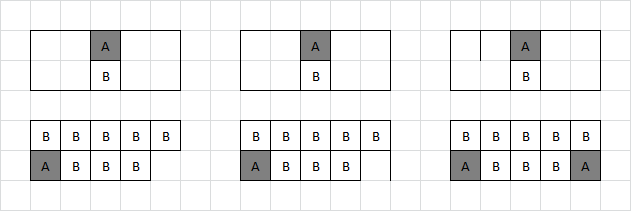
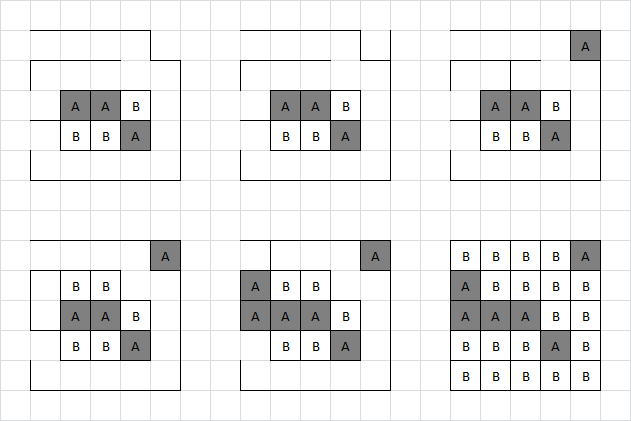
C1:

This grid shows the simplest example of declining boxes. Adam has been given the chain in the top right. If he takes all the boxes, he will need to give away the last three. Instead, he takes all but the last two boxes. Brenda takes these two but has to give Adam the final three.
C2:
Adam simply takes all the boxes in the chain, then sets off the remaining pair from the middle line. Brenda takes these two boxes and is forced to give away the remaining chain.
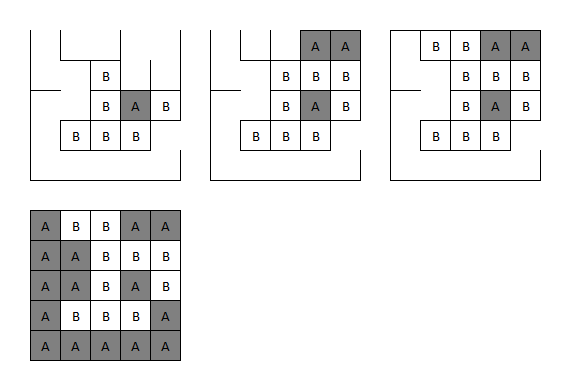
C3:
Adam has the choice here to take all four boxes available, or decline the last two. The remaining boxes will be split 5-each regardless of who's turn it is, so Adam might as well take all four. He then gives away the single box in the top right.
Brenda takes this box, then sets off the square in the centre (since declining a closed chain is more expensive for Adam than declining the open chain). Adam declines the entire square, forcing Brenda to give him the remaining five.
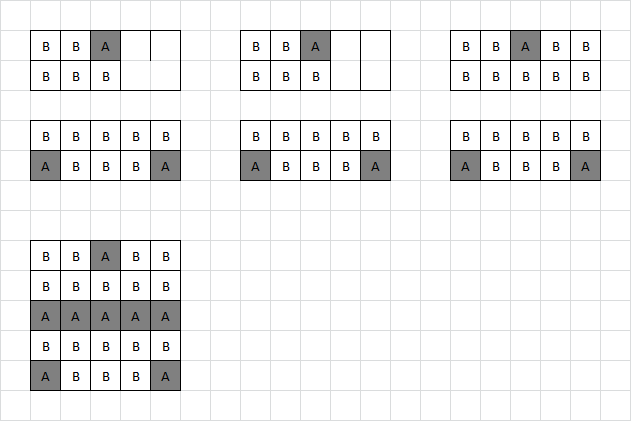
C4:
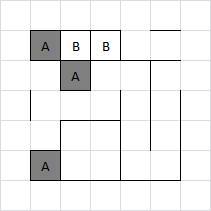
Adam cannot prevent Brenda from taking the long chain here. One option is to set it off early. This gives the following sequence.
The better option however is to move on the left, giving away just one box. Brenda can then give Adam two boxes and retain control, and she will still eventually claim the long chain, but the end result is still one box better for Adam (because Brenda now has to decline the square of four).
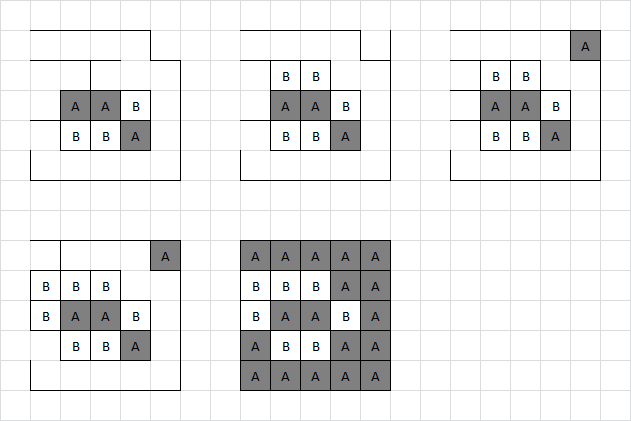
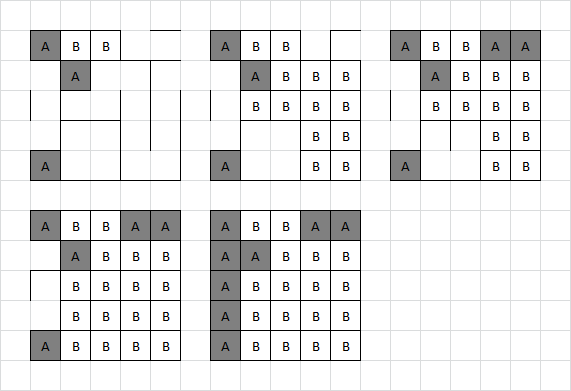
D1:
Adam has two free boxes and a long chain available to take, but should he decline the end of the chain? As it works out, declining costs two boxes to gain one (seven instead of six), so it's not worth it.
Similarly, Brenda takes the four boxes as declining would cost her four to gain only three. Adam takes the six boxes as declining would cost four to gain only three. And so the game plays out with everyone just taking all the boxes available.

Unfortunately, there were another seven alternative final grids (with the same score) that we missed in testing for D1, using the following sequences of plays:
In the second example, the two boxes taken by Brenda in the group of six could be any adjacent two in that group (depending a little on where Adam chooses to move in that group), leading to the seven alternatives (i.e. eight total possibilities).
D2:
Adam can give away either the long closed chain or the short open chain. If he gives away the short open chain of 3, Brenda will take one box, decline the other two, and end up with the long chain anyway. Better to just give away the long chain now. Brenda won't decline four to take the other three.
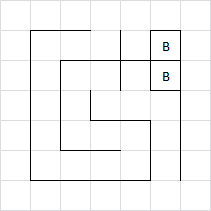
D3:
Adam must be careful how he gives away the pair of boxes. If he does it the wrong way this is what happens:
Instead, by moving in the centre, Adam gives Brenda no such opportunity.
D4:
In the top right corner, Adam has control over whether the group of four boxes will be a closed or an open loop. This impacts the parity of the board, as the closed square provides two more safe moves, while the open gives only one. In this case, closing gives Adam the parity he needs to claim the final long chain.
... at least that was the intended solution! As it turns out, Adam has an even better option for controlling the parity, which is to set off two boxes in that square right now. The remaining chain is open, but is only length 2 and so the parity still works out in Adam's favour.
Also, the two extra boxes Adam gets could equally be the two to the left of those shown. The puzzle creator would like to note that he would never have spotted this play himself, but did see it once he was told a better play for Adam existed. Apologies and thanks to those teams who spotted and reported this.
A post-competition corrected version of the entire puzzle which fixes all of the errors is given here: